```{ojs}
//| eval: false
//| echo: fenced
d3 = require('d3')
results = await d3.json("http://127.0.0.1:6312/secret_data_better", {
body: JSON.stringify({username: "your_name", password: "secret"}),
headers: {"content-type": "application/json"},
method: "POST"
})
```9 JWT authentication
Getting data through a GET request is easy enough. It’s just a URL that you visit, with any parameters you want to pass included in the URL.
GET requests are viewable in your browser URL bar and in your browser history and in the server logs of servers you access. It’s all public.
9.1 Handling POST requests
But what if you want to make some of your data accessible only to people with a username and password? You could make it so people have to pass a username and password to the server to check if they’re correct. A super naive example might look like this:
#* Super unsafe secret thing
#* @tag Authentication
#* @seralizer text
#* @get /secret_data
function(username, password) {
  if (username == "your_name" & password == "secret") {
    return("Here's some secret data")
  } else {
    api_error("Wrong username or password!", 401)
  }
}
If you visit the URL http://127.0.0.1:6312/secret_data?username=your_name&password=secret you’ll get access to the protected data, otherwise you won’t.
Easy!
But so incredibly dangerous!
Your password is right there in the URL for the whole world to see.
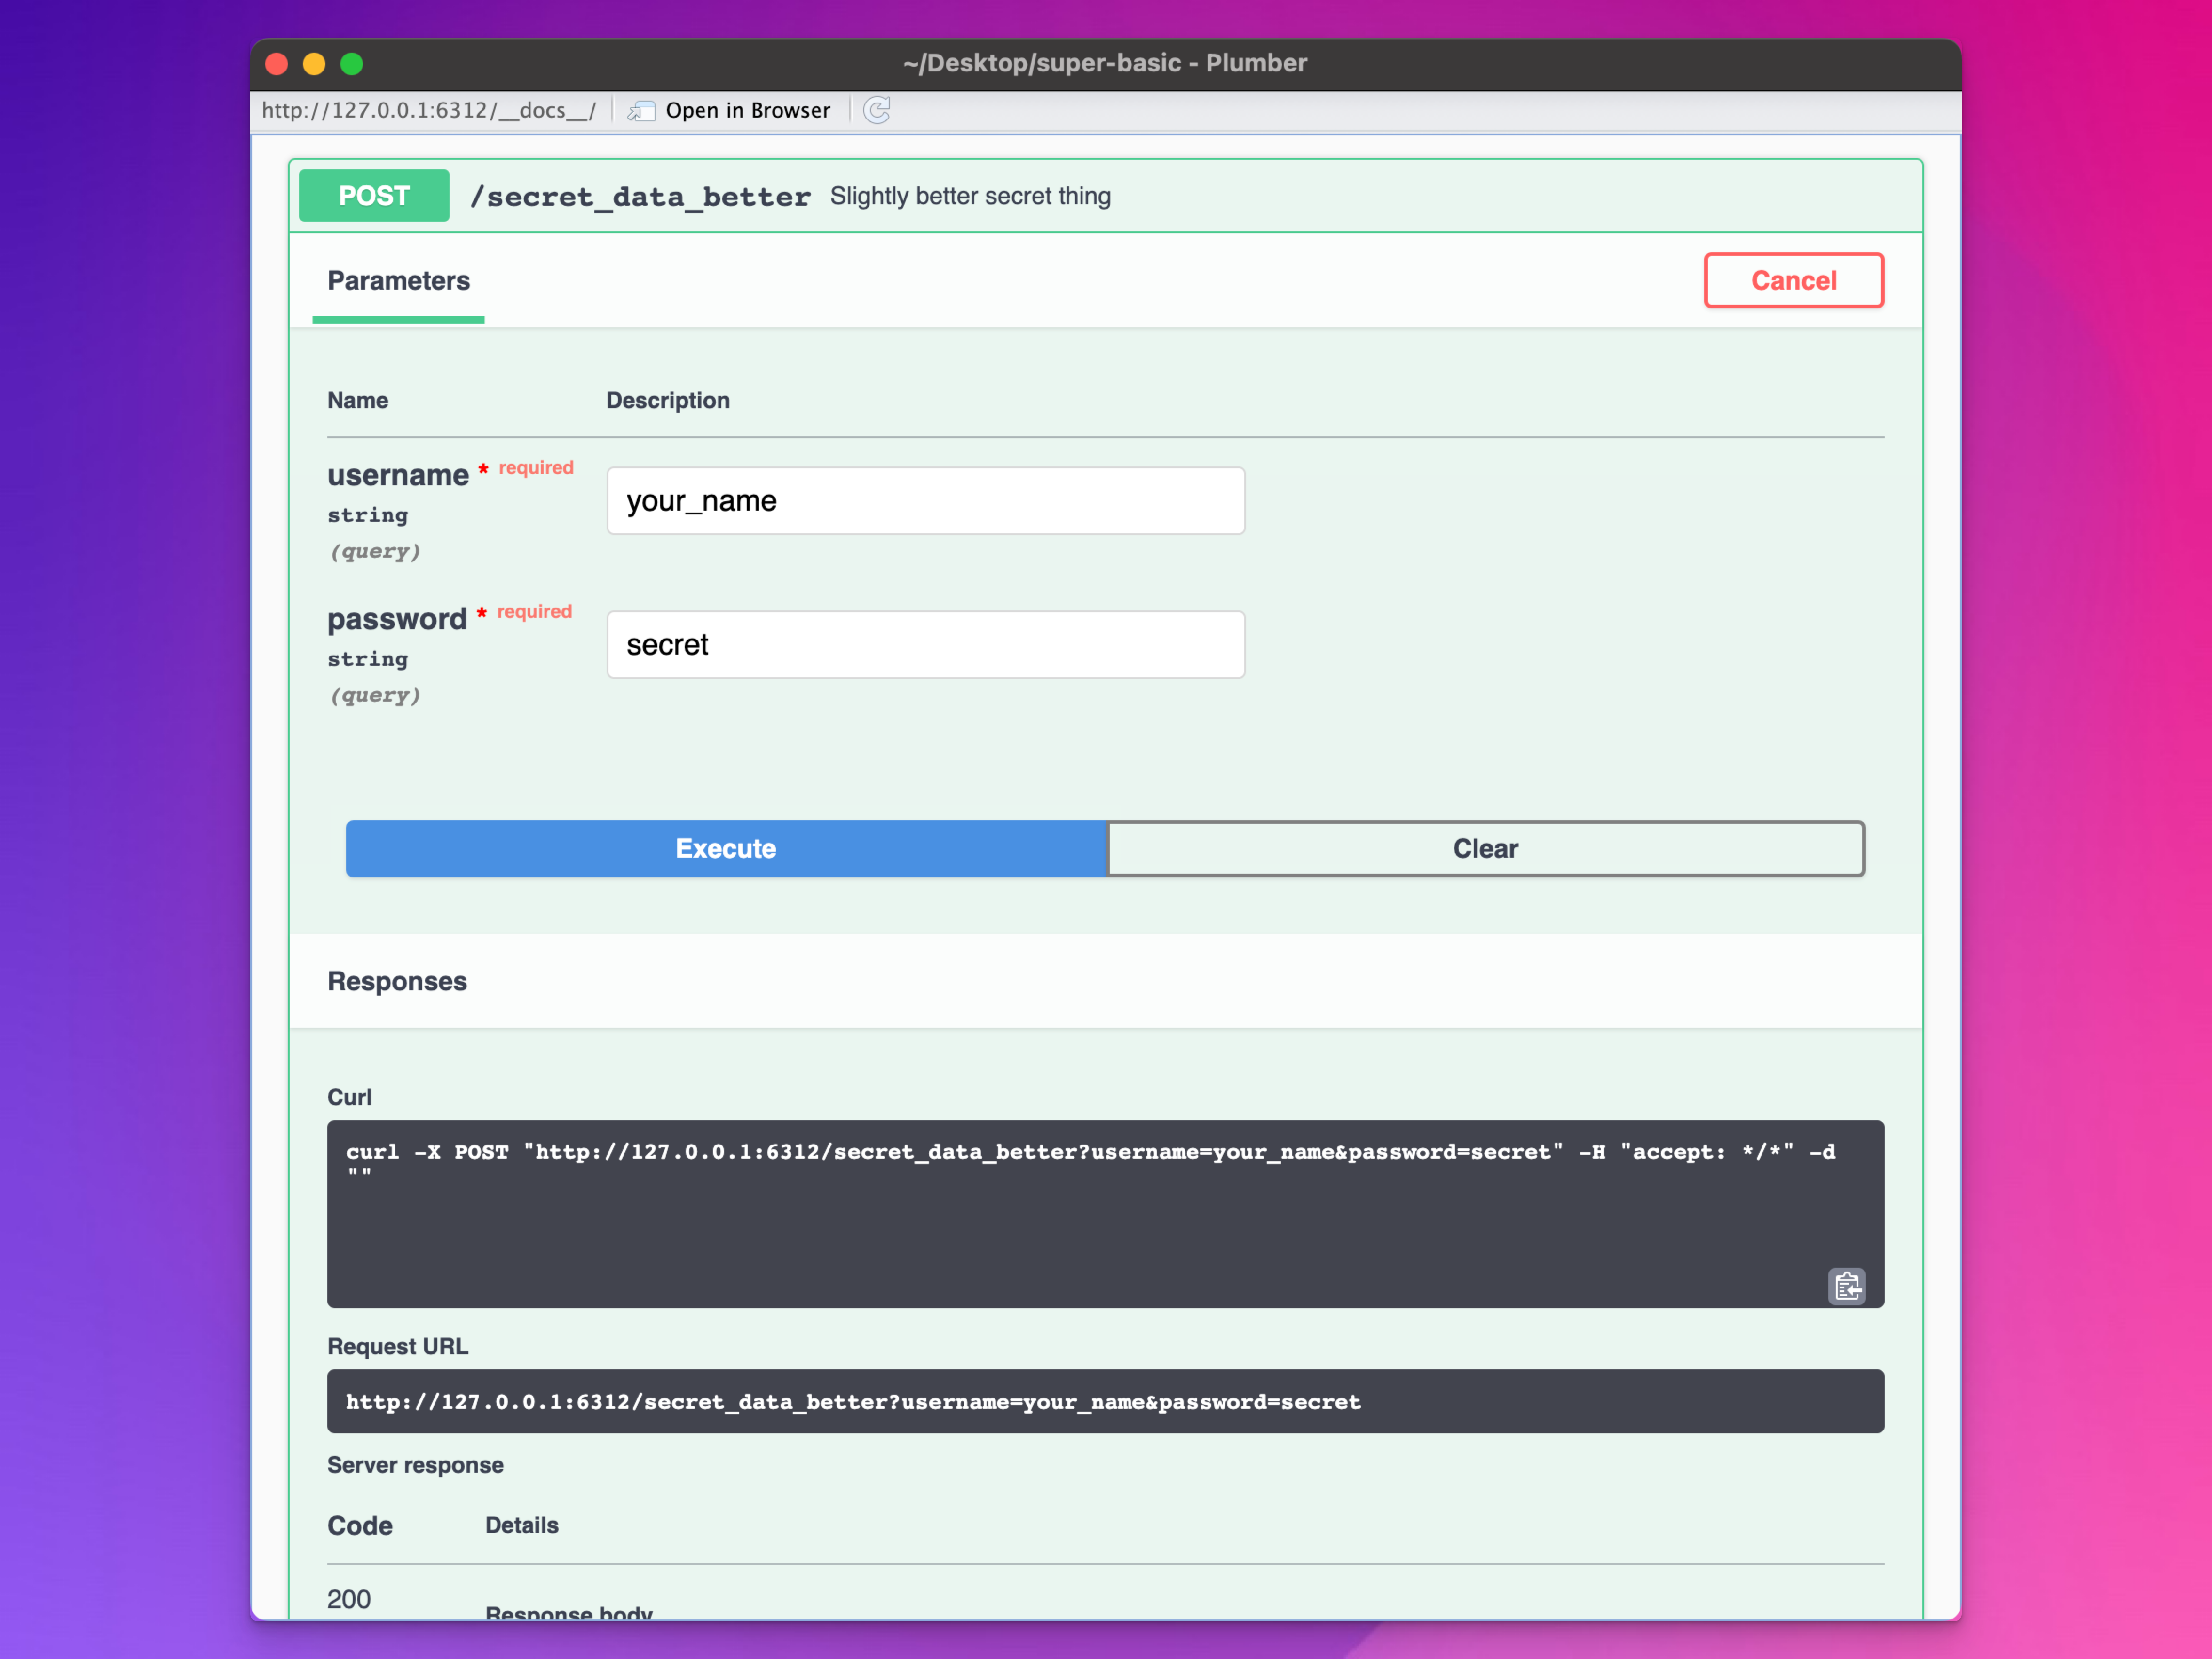
To fix this, we can change @get to @post, like so:
#* Slightly better secret thing
#* @tag Authentication
#* @seralizer text
#* @post /secret_data_better
function(username, password) {
  if (username == "your_name" & password == "secret") {
    return("Here's some secret data")
  } else {
    api_error("Wrong username or password!", 401)
  }
}
This requires that we send the parameters as the body of an HTTP request. They’re not included in the URL and have to be sent a special way. We can test this with the {plumber} documentation:
Or with {httr2} in R:
library(httr2)

request("http://127.0.0.1:6312/secret_data_better") |>
  req_method("POST") |>
  req_body_json(list(
    username = "your_name",
    password = "secret"
  )) |>
  req_perform() |>
  resp_body_json()
#> [[1]]
#> [1] "Here's some secret data"9.2 Hardcoded values are bad
In both those examples, though, we’ve still written out the actual username and password in plain text. In the R example, that’s bad, but if the script is never viewable by anyone other than you, I guess that’s okay. But if you commit that file to git or otherwise share your code, everyone will be able to see your credentials, and that’s super bad.
9.2.1 Fixing this with R
In R, we can get around this by setting those values as environment variables. You can do this a few different ways, like putting them in a file named .Renviron in your project. Here, so we don’t have to deal with filenames that start with . (which are hidden on macOS and Linux), we’ll make a separate file named secrets.R:
secrets.R
Sys.setenv(
  API_USERNAME = "your_name",
  API_PASSWORD = "secret"
)
Then, in whatever R script you’re using to access the API, you can run secrets.R, which creates environment variables you can access with Sys.getenv():
some-script-that-uses-the-api.R
library(httr2)

source("secrets.R")

request("http://127.0.0.1:6312/secret_data_better") |>
  req_method("POST") |>
  req_body_json(list(
    username = Sys.getenv("API_USERNAME"),
    password = Sys.getenv("API_PASSWORD")
  )) |>
  req_perform() |>
  resp_body_json()
#> [[1]]
#> [1] "Here's some secret data"
Now the actual script doesn’t include any plain text credentials and can safely be made public in git or whatever. Just make sure you don’t commit or share secrets.R or your .Renviron file if you put the environment variables there.
9.2.2 Fixing this with JavaScript
What if you’re using Observable to get POST data? You can’t set environment variables in a browser like you can with R—internet browsers are inherently different.
We have to use a different approach.
9.3 Token-based validation
Huge caveat!
What I show here is designed to work for one (1) user only, mostly because I want to have my goal tracking dashboards and documents easily accessible on the internet but still protect the APIs so that only I can see the data.
If you want to have multiple users, you can still use JWT tokens (they’re industry standard! Bluesky uses them!), but you’ll have to figure out how to safely and securely store usernames, passwords, and JWT secret phrases. Good luck.
To get this to work, we need to make sure the user visiting the website that’s running the Observable chunk is authorized to access the API with a POST request. We can do that a couple ways: by storing a cookie with user information, or by generating and storing a token with user information. This short video is a good overview of the two approaches:
We’re going to use the token-based approach where we’ll generate a JSON Web Token (or JWT), store it in the browser, and use it when making POST requests.
9.3.1 JWTs
To show how this works, imagine two different computers: (1) the server where the API is running, and (2) the person accessing it with their browser.
The server knows three pieces of information about each user:
- Their user name
- Their password
- A secret phrase that only lives on the server and the user doesn’t ever see
We use all three to generate tokens for users that will allow them to access protected data.
To illustrate this, we’ll generate an example JWT using the {jose} R package. This consists of a “claim,” or in this case, details about the user. Here we’ll make a key/value pair called valid_user and set it to TRUE. We then encode that claim with the secret phrase that only lives on the server and that the user doesn’t ever see. As a result, we get a big long string of text. This is the JWT.
library(jose)

claim <- jwt_claim(valid_user = TRUE)
key <- charToRaw("special-secret-string")
jwt <- jwt_encode_hmac(claim, key)
jwt
## [1] "eyJ0eXAiOiJKV1QiLCJhbGciOiJIUzI1NiJ9.eyJpYXQiOjE3MDUxMDY4NjYsInZhbGlkX3VzZXIiOnRydWV9.Xg_C0cXnUxLzdeZs3NdcgclMevYKrlXqkyyfFI66PFo"
If that JWT is passed to the server, we can actually decode it as long as we have that secret key:
jwt_decode_hmac(jwt, secret = "special-secret-string")
## $iat
## [1] 1705106866
##
## $valid_user
## [1] TRUE
Check it out! There’s our valid_user claim!
9.3.2 Generating JWTs for correct users
But right now we have a couple problems. First, that JWT generation code isn’t connected to any username or password, and second, it’s part of the API.
In general, you’d follow this pattern to generate a token only for users who submit the correct username and password. First, add a new entry to your environment variables in secrets.R for the secret signing key. Then we’ll use this generate_token() function to check if the passed username and password match the secrets stored on the server. If so, generate a token. If not, don’t.
# These should actually be set outside of this file, but we'll do it here for
# the sake of illustration
Sys.setenv(
  API_USERNAME = "your_name",
  API_PASSWORD = "secret",
  API_JWT_SECRET = "special-secret-string"
)

generate_token <- function(username, password) {
  if (username == Sys.getenv("API_USERNAME") & password == Sys.getenv("API_PASSWORD")) {
    # If the user submits the correct login details, generate a token for them
    claim <- jwt_claim(valid_user = TRUE, username = username)
    key <- charToRaw(Sys.getenv("API_JWT_SECRET"))
    jwt <- jwt_encode_hmac(claim, key)

    return(list(token = jwt))
  } else {
    return(list(error = "Invalid username or password"))
  }
}
So now we’ll pretend we’re on the other computer accessing the API. We’ll try generating a token with the wrong username:
generate_token(username = "your_name", password = "wrong")
## $error
## [1] "Invalid username or password"
Oh no, it didn’t work!
Let’s try the correct username and password:
generate_token(username = "your_name", password = "secret")
## $token
## [1] "eyJ0eXAiOiJKV1QiLCJhbGciOiJIUzI1NiJ9.eyJpYXQiOjE3MDUxMDY4NjYsInZhbGlkX3VzZXIiOnRydWUsInVzZXJuYW1lIjoieW91cl9uYW1lIn0.rdz2Xkzjq1B3RNwCZRTwNGUzhMYyIPCjMH5ruoQ3okU"
Yay, we’ve got a token!
9.3.3 Turning this into an official endpoint
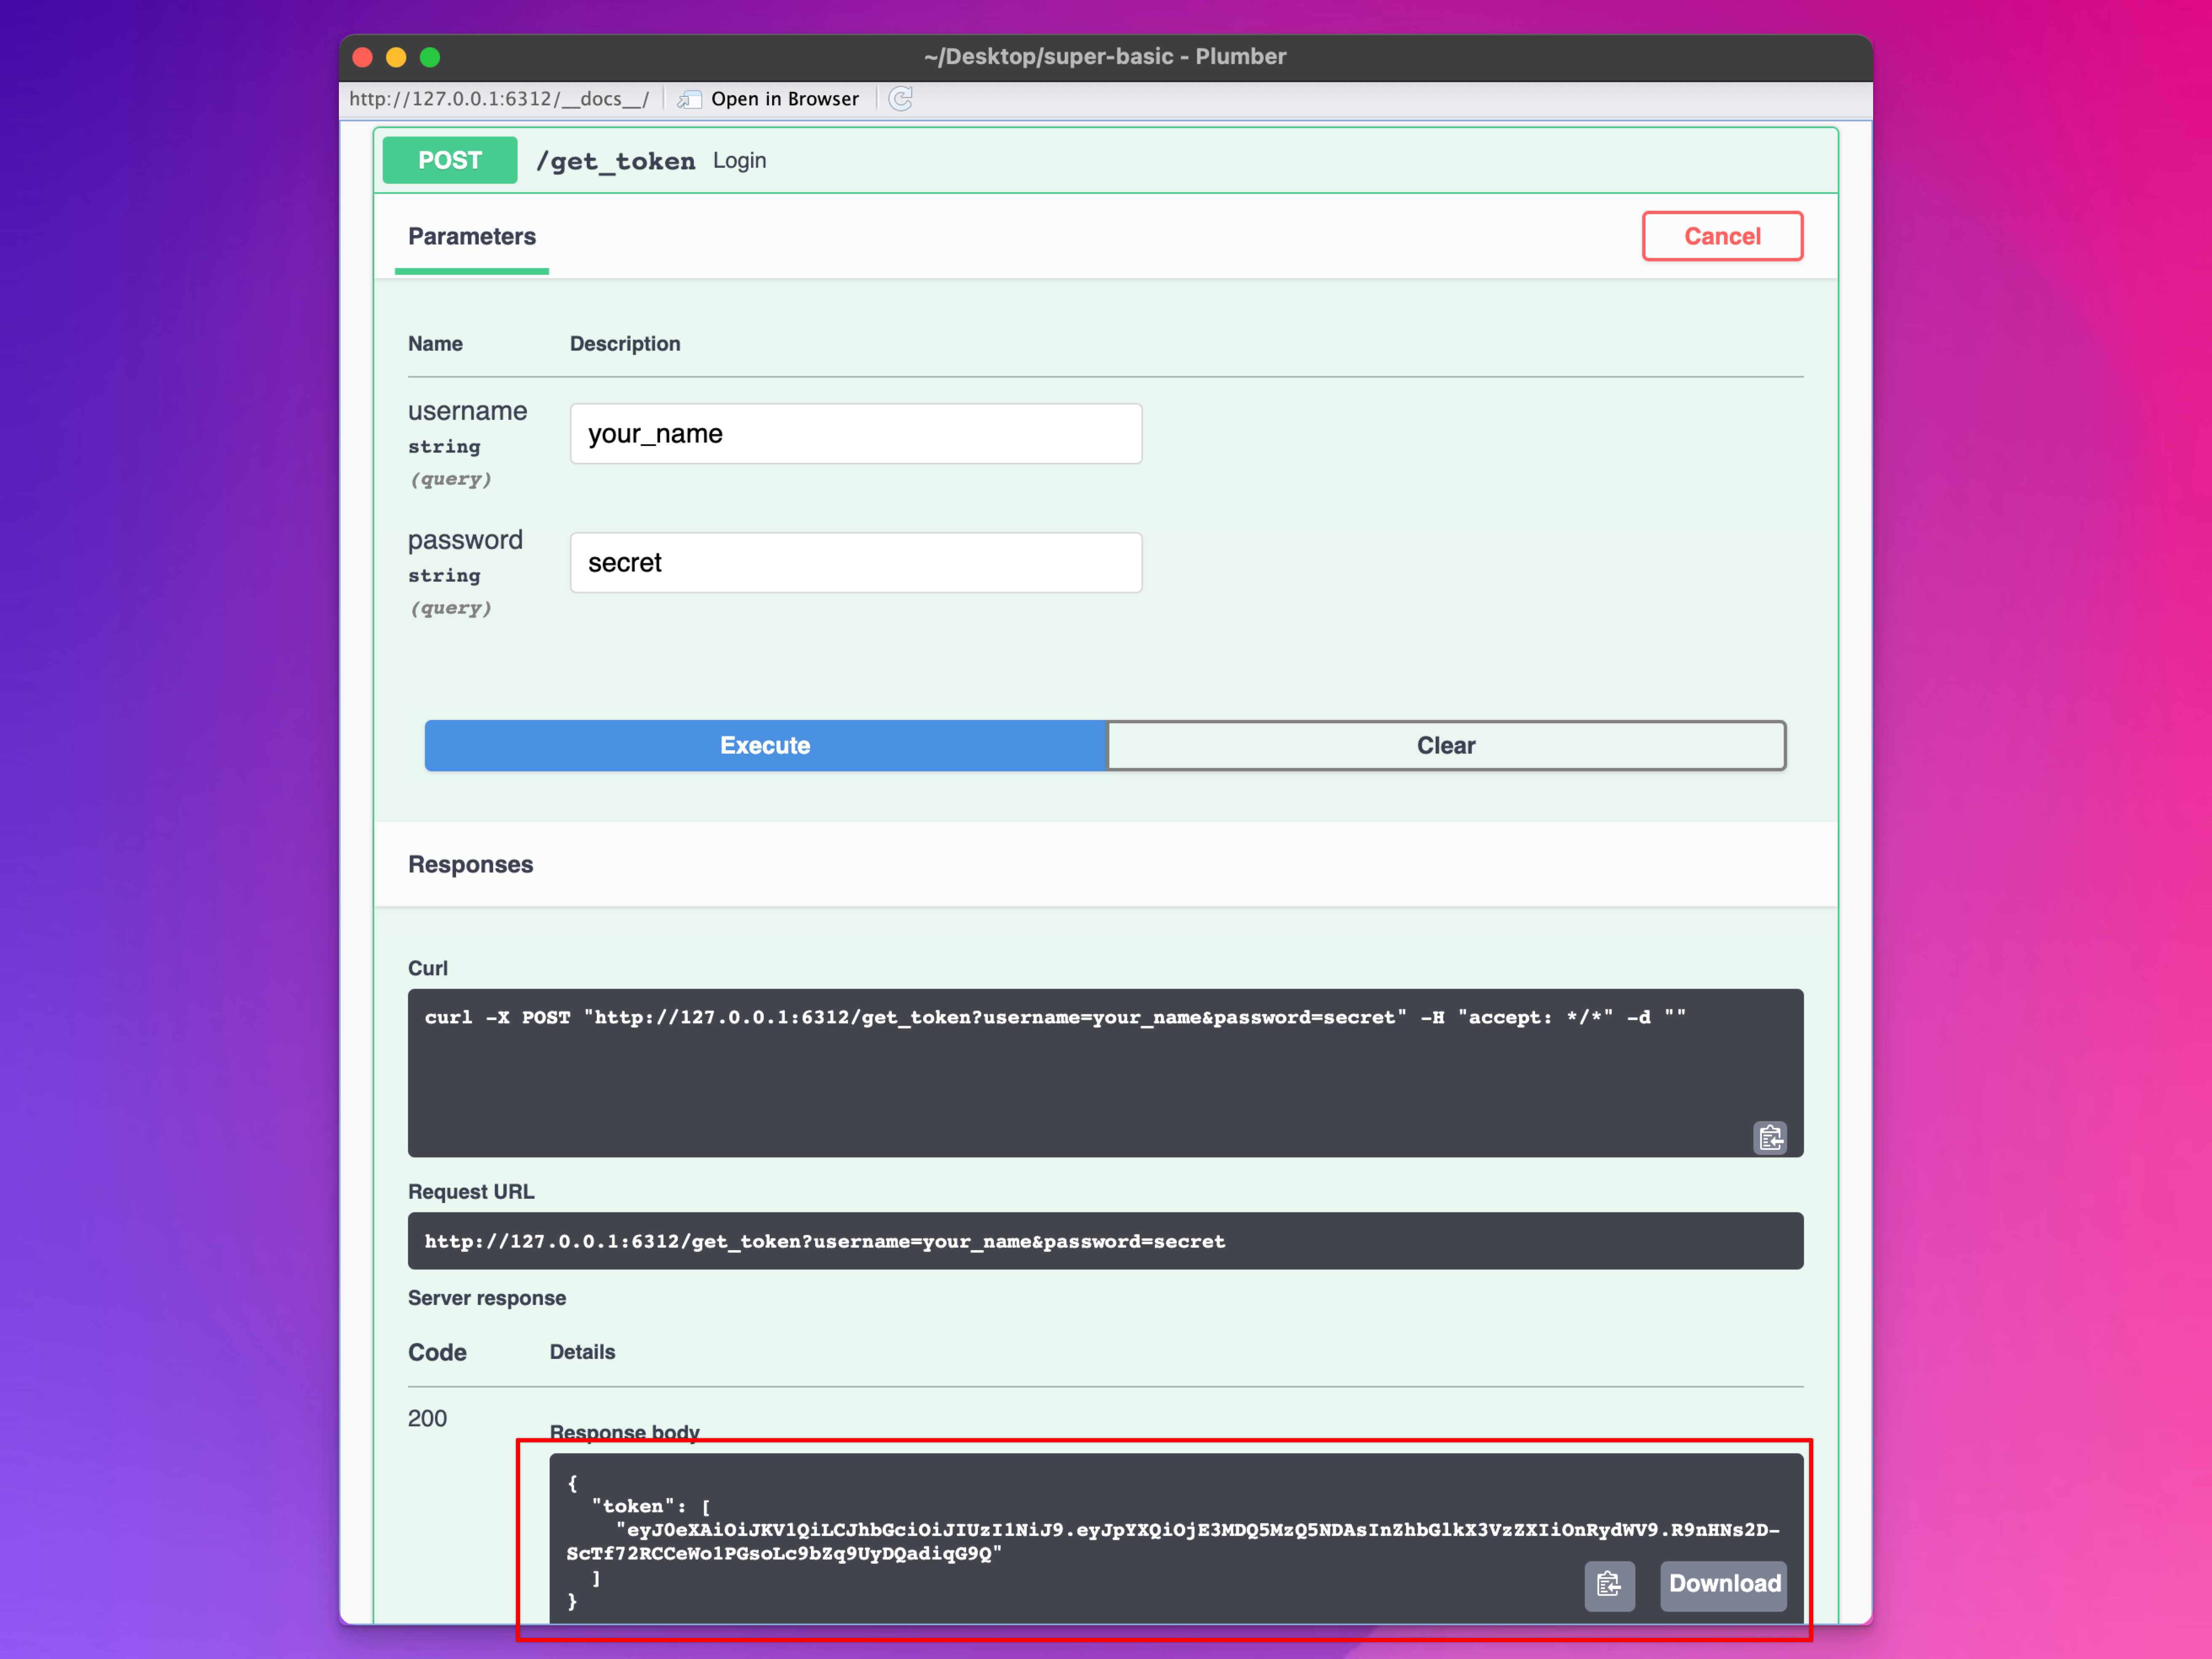
Right this token generation stuff isn’t really accessible from the API, so let’s make it an official endpoint, using POST. Add this to your plumber.R file:
#* Login
#* @post /get_token
function(req, res, username = "", password = "") {
  library(jose)

  if (username == Sys.getenv("API_USERNAME") & password == Sys.getenv("API_PASSWORD")) {
    # If the user submits the correct login details, generate a token for them
    claim <- jwt_claim(valid_user = TRUE, username = username)
    key <- charToRaw(Sys.getenv("API_JWT_SECRET"))
    jwt <- jwt_encode_hmac(claim, key)

    return(list(token = jwt))
  } else {
    api_error(message = "Invalid username or password", status = 401)
  }
}
All that’s new here is the req and res arguments to the function, which are related to the HTTP request that gets made through the API. If the username and password are wrong, the server will give a 401 Unauthorized error.
Restart your API and check out the documentation page. Try running the /get_token endpoint and see if you can generate a JWT. If all goes well, you should get a token! Try a different password or username and you should get a 401 error.
9.3.4 Limiting endpoints so that they can only be accessed with a token
We have a token now, and that’s all great, but now we need to do something with it and use it to protect certain endpoints.
We need to somehow accept the token that we previously generated and check to see if it can be decoded using the secret JWT phrase stored on the server. If so, that means it’s a valid token.
Let’s first see if we can decode that huge long token that we just created using the secret key:
token <- "eyJ0eXAiOiJKV1QiLCJhbGciOiJIUzI1NiJ9.eyJpYXQiOjE3MDQ5MzQ4MTQsInZhbGlkX3VzZXIiOnRydWUsInVzZXJuYW1lIjoieW91cl9uYW1lIn0.CBOXUjxE6Cc2MS0u11Wa-0CerIATmlJybOoJiSrXjbw"

jwt_decode_hmac(token, secret = Sys.getenv("API_JWT_SECRET"))
## $iat
## [1] 1704934814
##
## $valid_user
## [1] TRUE
##
## $username
## [1] "your_name"
Cool cool. Here’s what happens if we feed it an invalid token:
token <- "eyJ0eXAiOiJKV1QiLCJhbGciOiJIUzI1NiJ9.eyJpYXQiOjE3MDQ5MzQ4MTQsInZhbGlkX3VzZXIiOnRydWUsInVzZXJuYW1lIjoieW91cl9uYW1lIn0.CBOXUjxE6Cc2MS0u11Wa-wrongstuff"

jwt_decode_hmac(token, secret = Sys.getenv("API_JWT_SECRET"))
## Error: HMAC signature verification failed!
The token is wrong, so the user is wrong and doesn’t have access to whatever we’re protecting.
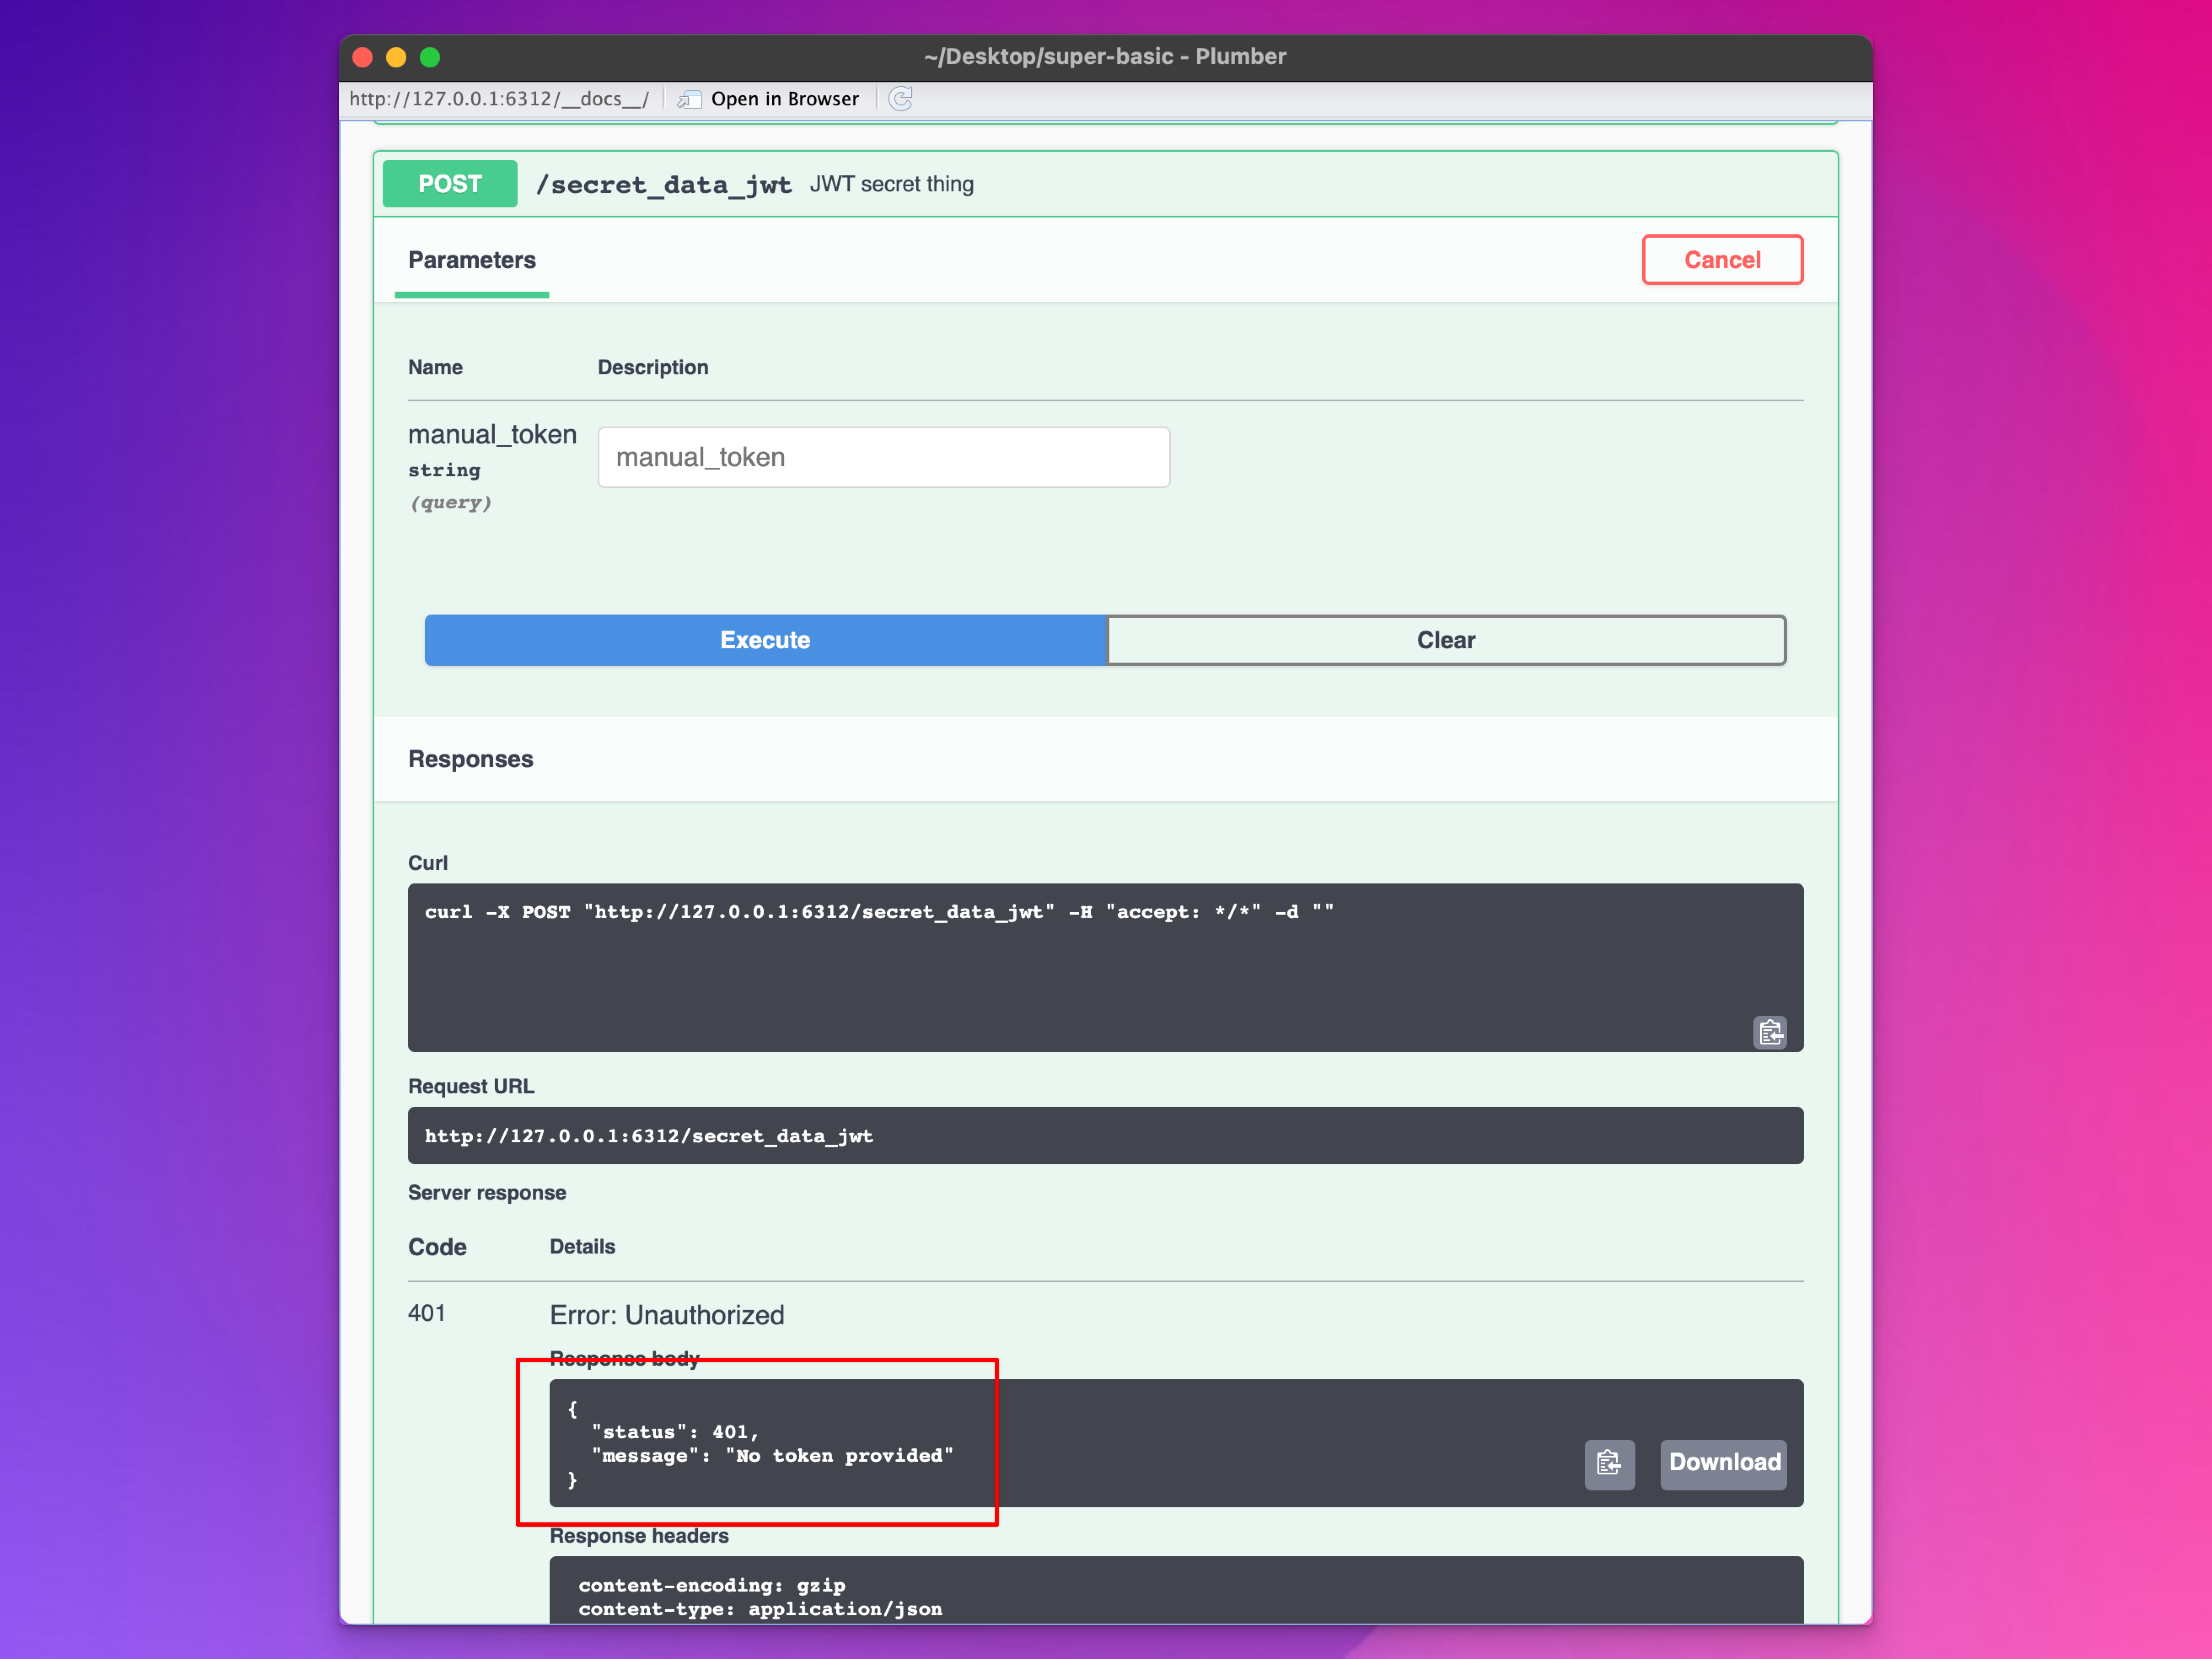
Let’s make this all work with the API now. We’ll put it in a function named require_token(). There are a few things to note here:
- This isn’t an endpoint, so it doesn’t have any
#*comments at the beginning. We’ll use it inside other endpoints to protect them. There’s a more official way to do this with filters, but I didn’t want to mess with those. - The token itself is extracted from the headers of the HTTP request with
token <- req$HTTP_AUTHORIZATION |> str_remove("^Bearer "). The user needs to pass the token through a POST request with a header calledAuthorizationand a body withBearer TOKEN_HERE. - We’ll also add a special backdoor argument named
manual_tokenhere so that we can use the documentation page to test this. It will let us pass a token manually as an argument without needing to set the HTTP headers.
require_token <- function(req, res, manual_token) {
  if (!is.na(manual_token)) {
    # If a manual token is passed, use that
    token <- as.character(manual_token)
  } else {
    # Otherwise use the one in the HTTP header
    token <- req$HTTP_AUTHORIZATION |> str_remove("^Bearer ")
  }

  # If there isn't a token, that's wrong
  if (is.null(token) | length(token) == 0) {
    api_error(message = "No token provided", status = 401)
  }

  # Decode the token. If it matches what's on the server, yay. If not, it's wrong.
  tryCatch({
    jwt_decode_hmac(token, secret = Sys.getenv("API_JWT_SECRET"))
    return(TRUE)
  }, error = function(e) {
    api_error(message = "Token is wrong", status = 401)
  })
}
Then to use it, we can include require_token(req, res, manual_token) at the beginning of one of the endpoints. Let’s make a new one:
#* JWT secret thing
#* @seralizer text
#* @post /secret_data_jwt
function(req, res, manual_token = NA) {
  require_token(req, res, manual_token)

  return("Here's some secret data")
}
Restart the API and open the documentation page. Go down to /secret_data_jwt and try running it. You should get an error:
Paste in the big ol’ token we generated previously and try running it. You should be able to access the secret data!

9.3.5 Sending a token via POST with R
We just used the backdoor manual_token option to send our token, which is nice for debugging, but we technicaly should be sending it to the server as an HTTP header. Here’s how we can do that with {httr2}, either with req_headers(), where we have to specify a key/value pair like Authorization = "Bearer BLAH":
library(httr2)

request("http://127.0.0.1:6312/secret_data_jwt") |>
  req_method("POST") |>
  req_headers(
    Authorization = "Bearer eyJ0eXAiOiJKV1QiLCJhbGciOiJIUzI1NiJ9.eyJpYXQiOjE3MDQ5MzQ4MTQsInZhbGlkX3VzZXIiOnRydWUsInVzZXJuYW1lIjoieW91cl9uYW1lIn0.CBOXUjxE6Cc2MS0u11Wa-0CerIATmlJybOoJiSrXjbw"
  ) |>
  req_perform() |>
  resp_body_json()
#> [[1]]
#> [1] "Here's some secret data"
…or by using the neat req_auth_bearer_token() function, which does that for us:
request("http://127.0.0.1:6312/secret_data_jwt") |>
  req_method("POST") |>
  req_auth_bearer_token("eyJ0eXAiOiJKV1QiLCJhbGciOiJIUzI1NiJ9.eyJpYXQiOjE3MDQ5MzQ4MTQsInZhbGlkX3VzZXIiOnRydWUsInVzZXJuYW1lIjoieW91cl9uYW1lIn0.CBOXUjxE6Cc2MS0u11Wa-0CerIATmlJybOoJiSrXjbw") |>
  req_perform() |>
  resp_body_json()
#> [[1]]
#> [1] "Here's some secret data"
9.3.6 Generating and storing the token with your browser
(Almost done for real! Don’t worry!)
So far we’ve been dealing with long hairy token strings. Those are (1) miserable, and (2) still not quite helpful for things like Observable, where we need to make a POST request with the browser but not hardcode any token values into the code.
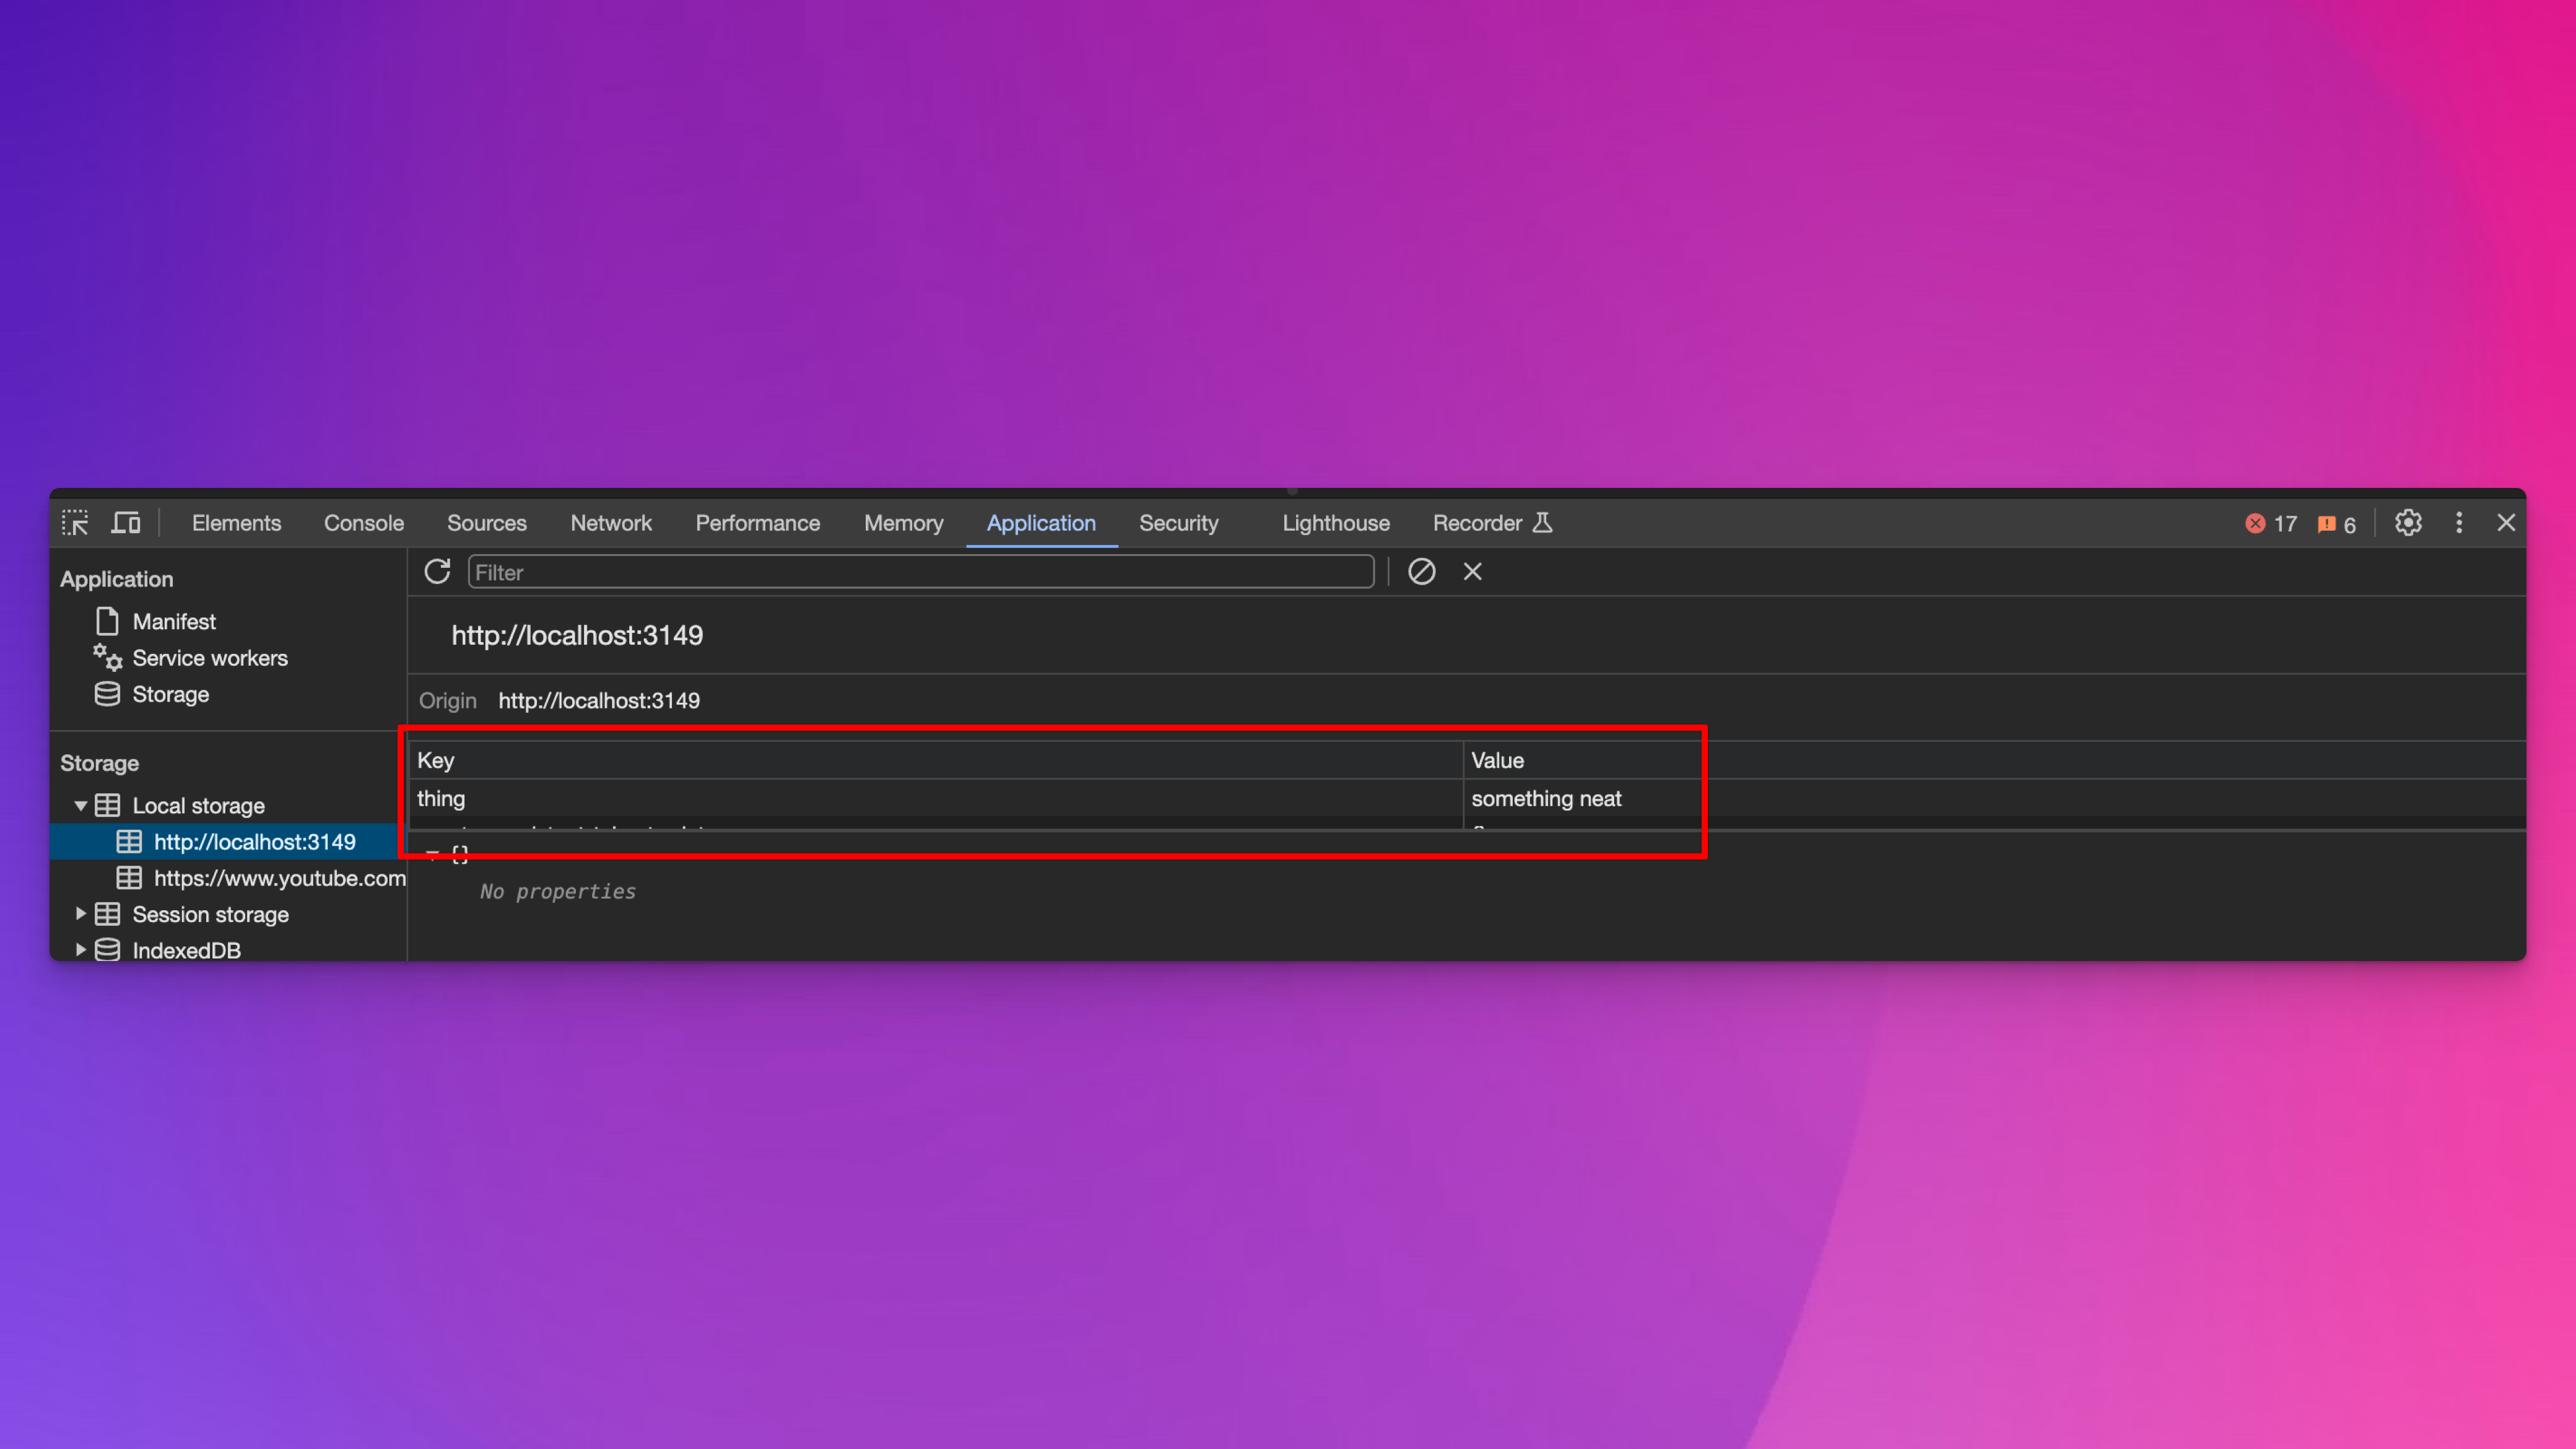
To get this to work in a browser, we need to retrieve a token and store it somewhere. All browsers have something called “local storage” that JavaScript can access. You can programmatically put site-specific stuff in there and programmatically access stuff from there. Right click on this page and choose “Inspect” and go to the “Application” tab and you can see what’s in there. In this case, my local preview of this Quarto document, nothing is there right now:
![]()
If you go to the “Console” tab, you can add stuff to that local storage by running this command:
localStorage.setItem('thing', 'something neat')Then if you look at the local storage section again, you’ll see that “thing” now equals “something neat”:
If you go back to the Console panel, you can access that item with JavaScript by running this command:
localStorage.getItem('thing')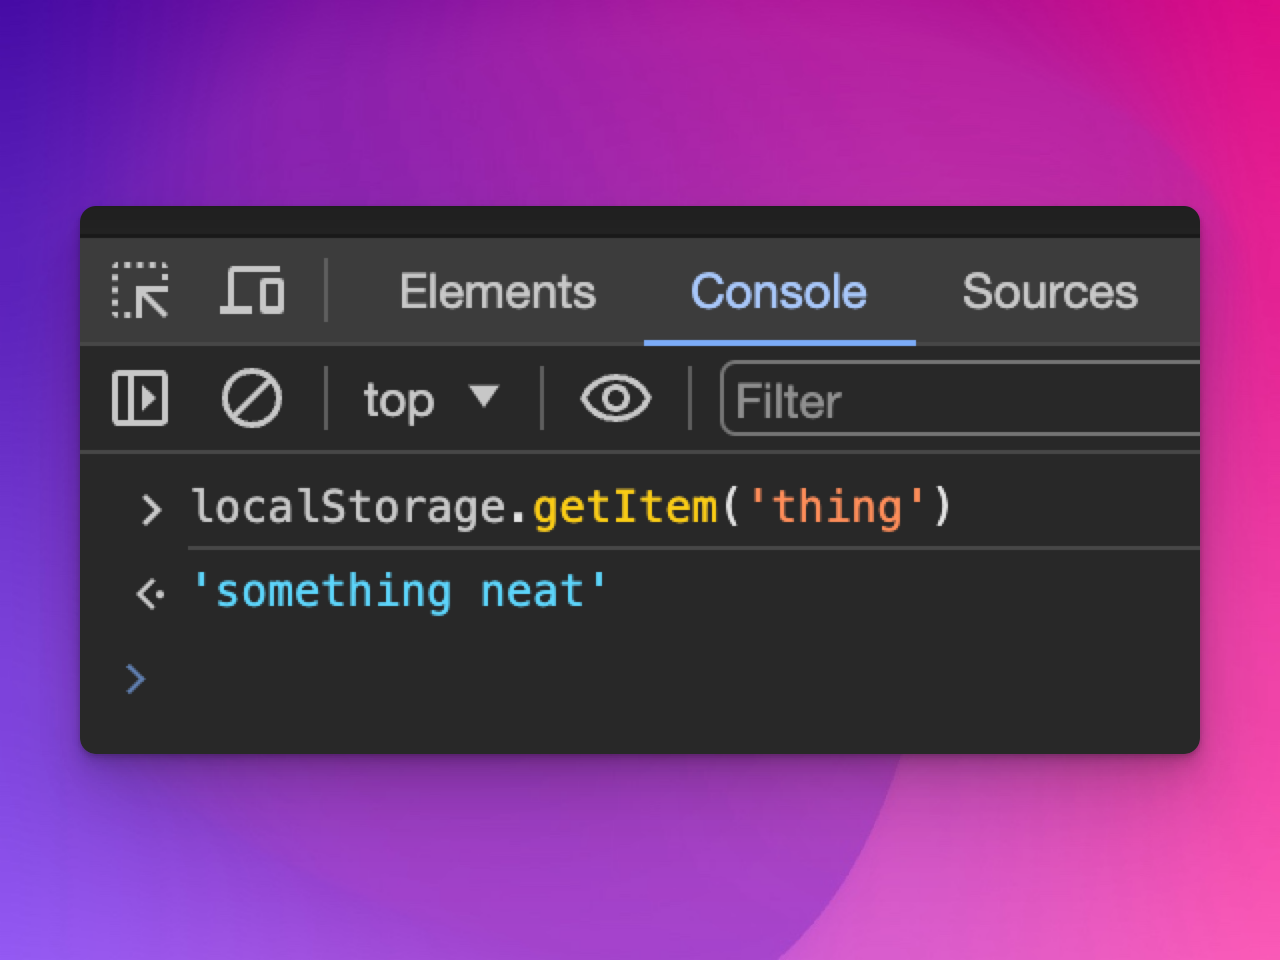
Requiring a user to copy a valid token from the API and sticking it in their site-specific local storage like that is miserable and bad though. We don’t want to do that.
Instead, we can use JavaScript to make a POST request that will get a token from the API and then store it in the browser’s local storage.
Here’s a little login form for my API. The username is your_name and the password is secret. Try logging in:
<div id="login-note"></div>

<div class="grid">
  <div class="g-col-12 g-col-md-6 g-start-0 g-start-md-4">
    <form id="login">
      <div class="mb-3">
        <input type="text" id="username" class="form-control" placeholder="Name" aria-label="Name">
      </div>
      <div class="mb-3">
        <input type="password" id="password" class="form-control" placeholder="Password" aria-label="Password">
      </div>
      <button type="submit" class="btn btn-primary">Submit</button>
    </form>
  </div>
</div>

<script>
  document.getElementById('login').addEventListener('submit', function(event) {
    event.preventDefault();

    let login_note = document.getElementById('login-note');

    var username = document.getElementById('username').value;
    var password = document.getElementById('password').value;

    fetch('http://127.0.0.1:6312/get_token', {
      method: 'POST',
      headers: {
        'Content-Type': 'application/json'
      },
      body: JSON.stringify({
        username: username,
        password: password
      })
    })
    .then(response => response.json())
    .then(data => {
      if (data.token) {
        localStorage.setItem('token', data.token);
        login_note.innerHTML = `
          <div id="alertContainer" class="container mt-3">
            <div class="alert alert-success" role="alert">
                Logged in!
            </div>
          </div>
        `;
      } else {
        throw new Error('No token in response');
      }
    })
    .catch(function(error) {
      console.log(error);
      login_note.innerHTML = `
        <div id="alertContainer" class="container mt-3">
          <div class="alert alert-warning" role="alert">
              Wrong username or password!
          </div>
        </div>
      `;
    });
  });
</script>
If it worked, you should be able to see the token in your local storage:
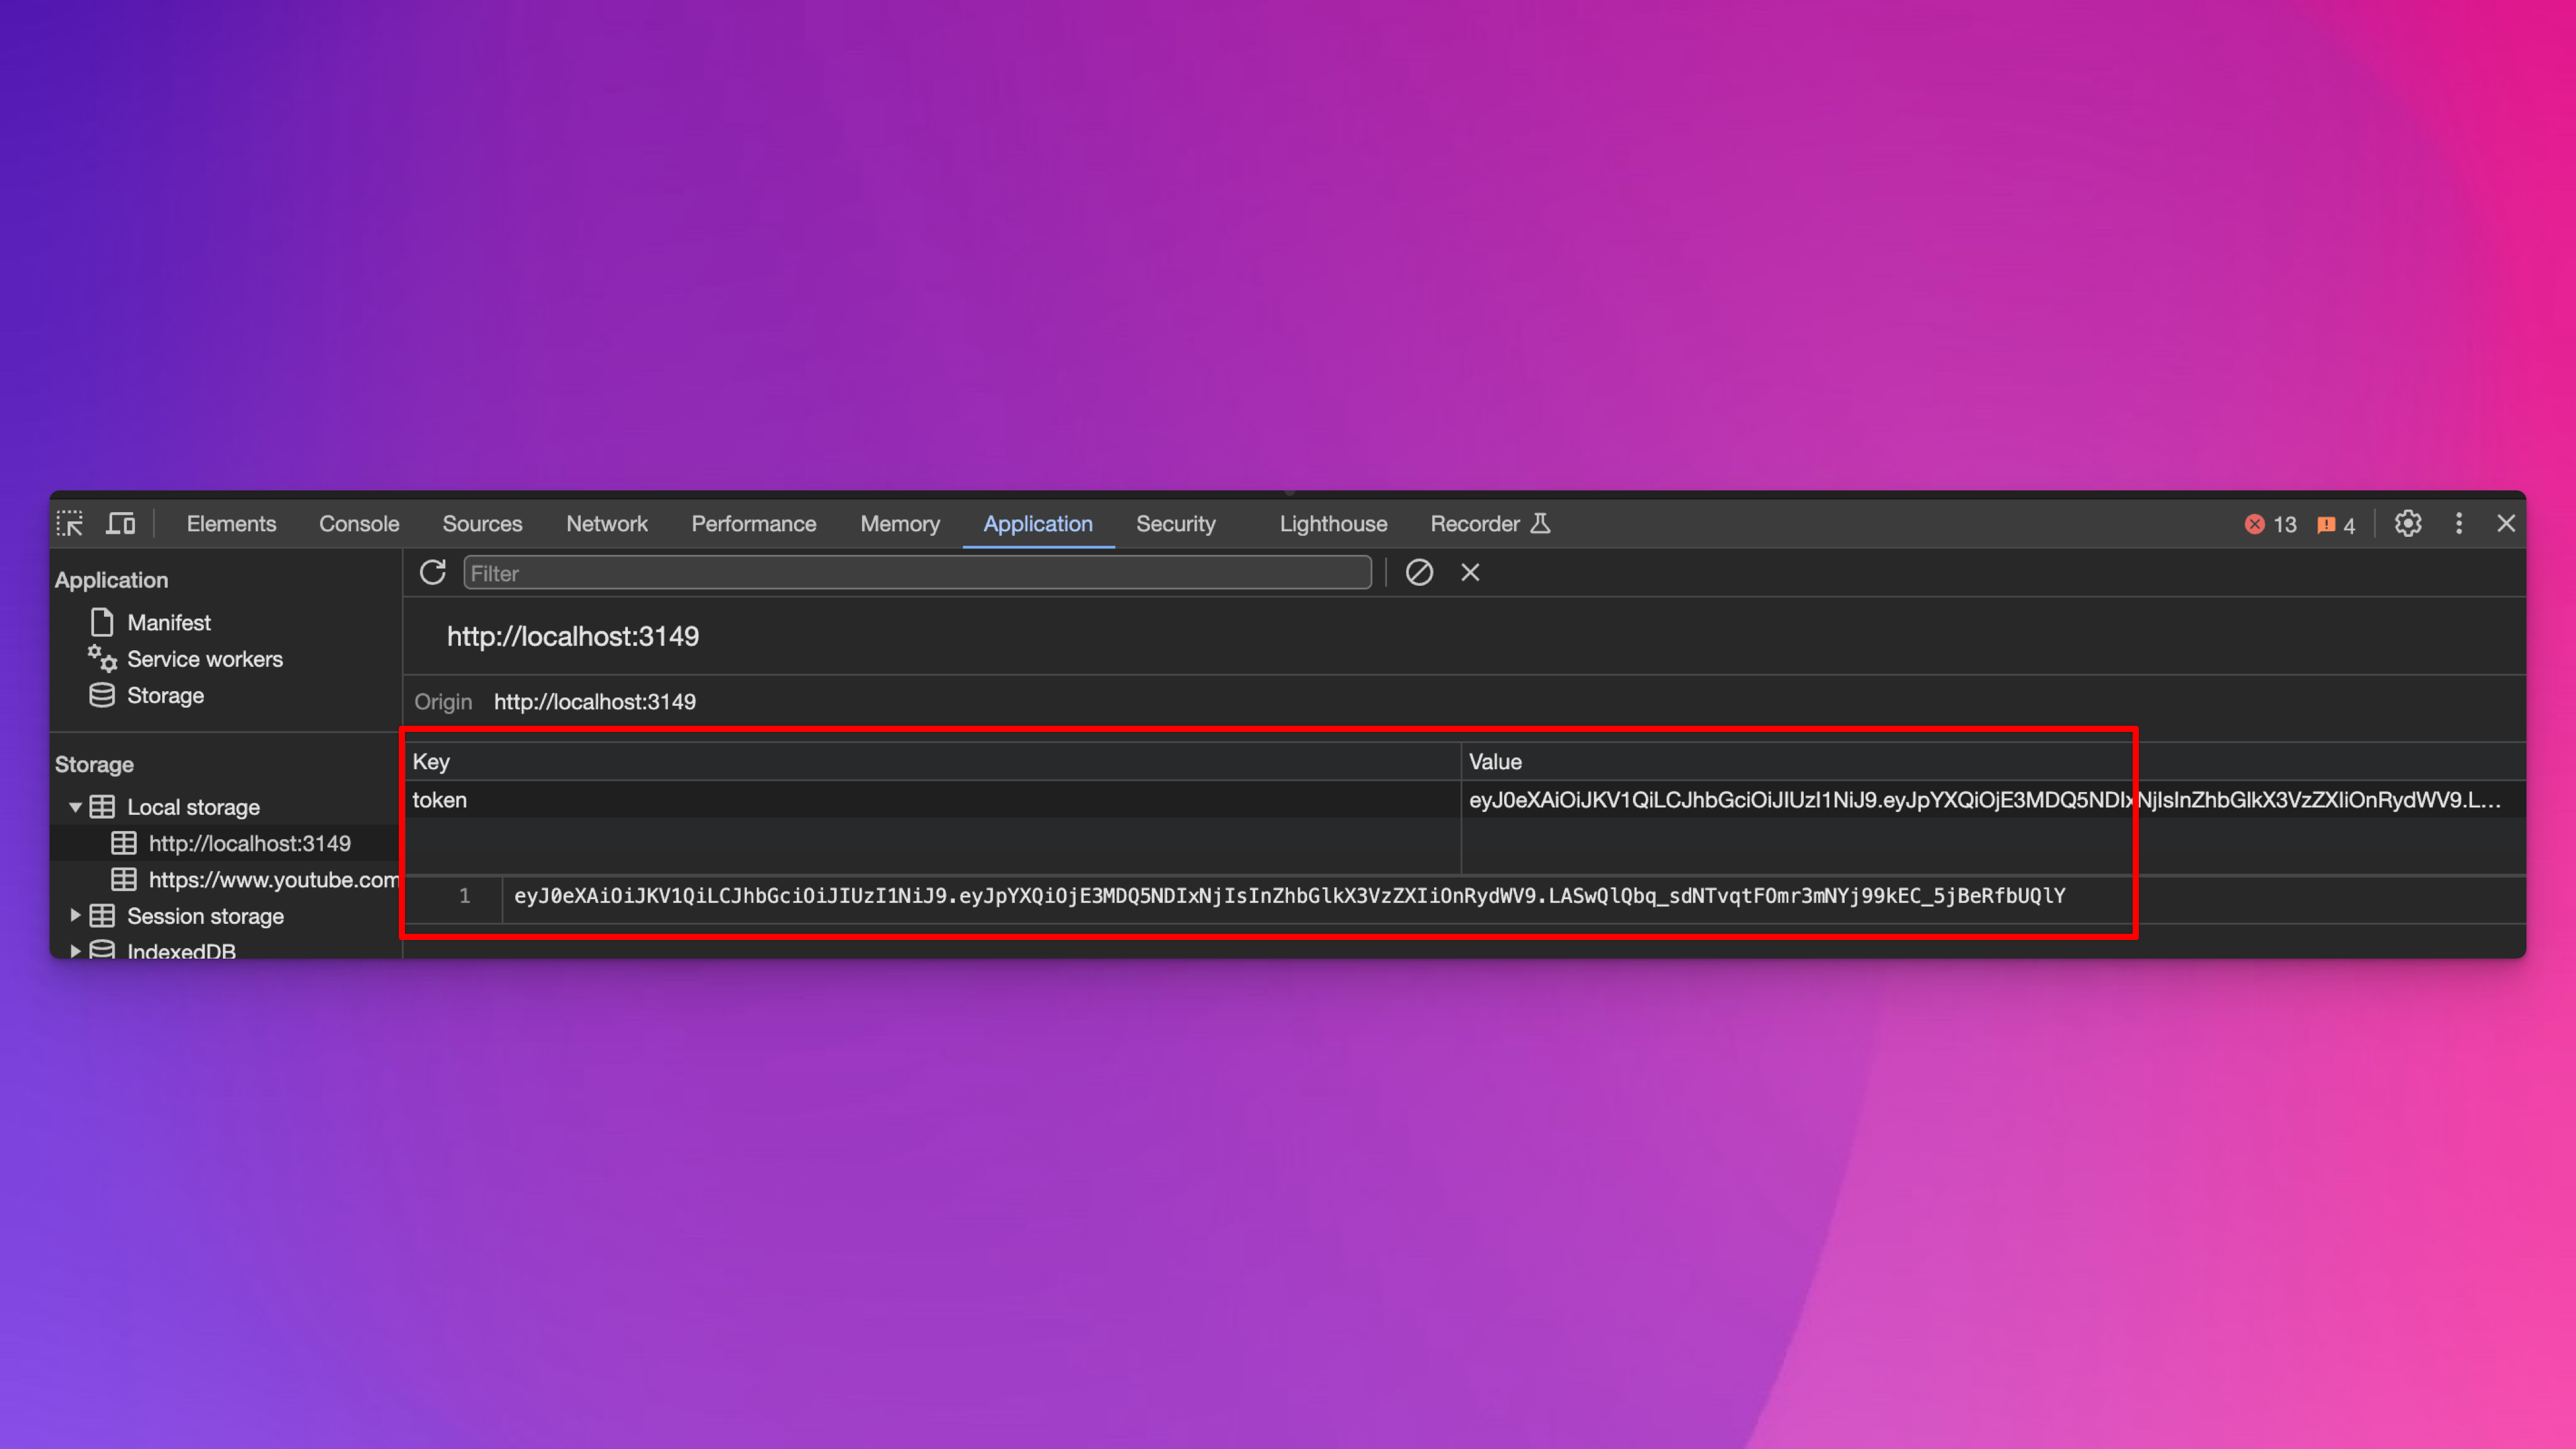
Now that the token is stored locally in our browser, we can use it with JavaScript, like with Observable. The magic of this is that you can make this code public. No private credentials are hardcoded here!
```{ojs}
//| echo: fenced
//| eval: false

// Get the token from local storage
token = localStorage.getItem('token')

d3 = require('d3')

results = await d3.json("http://127.0.0.1:6312/secret_data_jwt", {
  body: "",
  headers: {
    "Authorization": `Bearer ${token}`,  // Send the token through POST
    "content-type": "application/json"
  },
  method: "POST"
})
```
9.3.7 Logging out
To log out, we just need to remove the token from local storage. You could do this manually through the Applications tab of the browser inspection console, but that’s miserable. Instead, we can use a little bit of JavaScript:
<div id="logout-note"></div>

<div class="d-flex justify-content-center">
    <button id="logout-button" class="btn btn-danger">Logout</button>
</div>

<script>
document.getElementById('logout-button').addEventListener('click', function() {
  let logout_note = document.getElementById('logout-note');

  if(localStorage.getItem('token') !== null) {
      localStorage.removeItem('token');
      logout_note.innerHTML = `
        <div id="alertContainer" class="container mt-3">
          <div class="alert alert-success" role="alert">
              Logged out!
          </div>
        </div>
      `;
  } else {
      logout_note.innerHTML = `
        <div id="alertContainer" class="container mt-3">
          <div class="alert alert-warning" role="alert">
              No JWT token found in local storage!
          </div>
        </div>
      `;
  }
});
</script>
9.4 Current plumber.R file
We’ve added a few new endpoints to the server, and we’ve started a separate document or script that can access the server. Here’s where everything stands now: